# RAID Reinstallation
## REQUIREMENTS
1. A USB with 8GB of storage space (32GB Max)
2. A little bit of handiness, and a little knowledge about PCs
### THIS WAY OF REINSTALLING IS HIGHLY RECOMMENDED!
{% hint style="warning" %}
**🌟 Easiness: 7/10 Doable, not hard | Takes max 15 Minutes.🕒**
{% endhint %}
WHY IS THIS HIGHLY RECOMMENDED?
The reason this reinstallation method is recommended, especially for those with multiple HWID bans on their PC, is that it also changes your disk drive serials. This is a crucial step and contributes to a nearly **99% success rate for spoofing.**
**Reminder: This guide is MAINLY for AMD, unless you're experienced with Intel. 💢.**
***
### HOW TO REINSTALL & SPOOF DISKS (BYPASS DISK BAN)
After creating a Windows 10 USB and placing the correct RAID Drivers onto your USB, you can now RAID. This will format your drive, meaning everything on the disk will be deleted, backup any files you do not want to lose before you raid.
**Raid Drivers Provided On Jinxware Server**
***
{% embed url="" %}
Windows Download
{% endembed %}
* Download the Media Creation Tool above, click **"Download Now"**
* Open the **Media Creation Tool as an administrator**
* Select **Create Installation media (USB Flash drive)**
* Use all the recommended options & continue & wait for it to finish.
{% hint style="danger" %}
***MAKE SURE TO\*\*\*\* ****REMEMBER**** \*\*\*\*YOUR DISK SERIALS. MAKE A PHOTO OF THEM ON YOUR PHONE.***
***USE OUR SERIAL CHECKERS!***
{% endhint %}
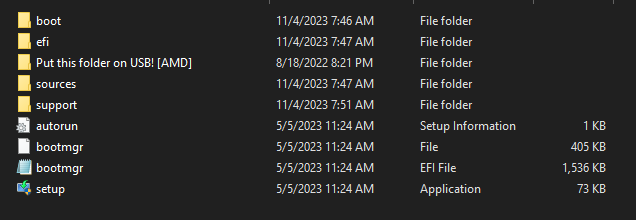
### YOUR USB SHOULD LOOK LIKE THIS SCREENSHOT
{% hint style="danger" %}
**NOTE:** When reinstalling Windows, most modern systems will automatically detect and install basic Ethernet drivers, so your connection will work fine after the installation. ✅
**In some cases, you may need to manually download and install network drivers.**
Make sure to download your network drivers (LAN) from your corresponding motherboard model. So, for example, "Asus B550 Network drivers" on Google, and put them in the USB drive. You can skip this step since this is just a precaution, but there is a small risk of no connection after reinstallation. 🌐
{% endhint %}
🔹 STEP 2: BOOT INTO BIOS
**Once completed**, and the USB looks like the screenshot above, restart the computer, and boot into bios. **How to boot into BIOS:** [**Video tutorial here (simple)**](https://www.youtube.com/watch?v=mb9X9_NNxuo). ✅
🔹 STEP 3: ENABLE RAID MODE IN BIOS
**Once in BIOS**, follow the steps listed here down below to enable RAID.
Advanced > Integrated peripherals (or) Storage Configurations. SATA Mode > "**RAID**" / NVME Mode > "**RAID**"
**SAVE & EXIT BIOS, GET BACK INTO BIOS AGAIN AFTER.**
Back in BIOS locate following option: `Advanced` -> `RAIDXpert2 Configuration Utility`. (On Gigabyte: Settings -> IO Ports -> `RAIDXpert2 Configuration Utility`.)
In the RAIDXpert2 menu do the following:
1. Enter `Manage Arrays / Array Management`.
2. Select `Delete Arrays` (if not grayed out).
1. Select every single disk you have!
2. Confirm to delete (this will delete all data on the disks).
3. If successful it will say: No more disks to delete!
In RAIDXpert2 navigate to `Manage Arrays / Array Management` -> `Create Array`.
1. Select Raid Level `Raidable`
2. Select `Select Physical Disks`
1. Select your disk; choose `Enable`
2. Select `Apply Changes`
Press `Create array` to create the array.
If you have multiple disks; create an array for each individual disk.
🔹 STEP 4: RAID SETUP VIDEO
[**BIOS RAID Configuration (simple)**](https://streamable.com/9o2zci) <- video instructions for RAID. 💾
***
* **USE WINDOWS 10 PRO | MAKE AN OFFLINE ACCOUNT**
{% tabs %}
{% tab title="AM4" %}
**Installation for AM4 Processors:**
* Save & exit the BIOS and ensure the USB you set up is plugged into your pc.
* You should see the Windows setup like the image below!

* Change the language settings if needed.
* Press `next` in the setup.
* If the setup ask your for product key, select `I don't have a product key`
* Select the operating system: `Windows 10 Pro`
* Accept the TOS and `press next`.
* Now at setup step `Where do you want to install Windows?` you select `Load driver`. You will get a pop-up; select browse:
* 
* Navigate to the USB stick.
* Then select folder dropdown `Put this folder on USB`
* Select the `NVMe_RAID or SATA_RAID` -> Press `Ok`.
* Choose the first option; "AMD-RAID Bottom Device" Driver, then select `next`.

1. Select `Load driver` again.
2. Navigate to the USB stick.
3. Then select folder dropdown `Put this folder on USB`
4. Select the `NVMe_RAID or SATA_RAID` -> Press `Ok`.
5. Choose the third option; "AMD-RAID Controller" Driver, then select `next`.

* Select the disk you want to install Windows on and press next.
* Continue to install windows; then you're done!
{% endtab %}
{% tab title="AM5" %}
**Installation for AM5 Processors:**
* Save & exit the BIOS and ensure the USB you set up is plugged into your pc.
* You should see the Windows setup like the image below!

* Change the language settings if needed.
* Press `next` in the setup.
* If the setup ask your for product key, select `I don't have a product key`
* Select the operating system: `Windows 10 Pro`
* Accept the TOS and `press next`.
* Now at setup step `Where do you want to install Windows?` you select `Load driver`.
* You will get a pop-up; select browse:
* 
* Navigate to the USB stick.
* Then select folder `Put this folder on USB` -> Press `Ok`.
* Choose the first option; "AMD-RAID Bottom Device" Driver, then select `next`.

1. Select `Load driver` again.
2. Navigate to the USB stick.
3. Then select folder `Put this folder on USB` -> Press `Ok`.
4. Choose the third option; "AMD-RAID Controller" Driver, then select `next`.

* Select the disk you want to install Windows on and press next.
* Continue to install windows; then you're done!
{% endtab %}
{% endtabs %}
\
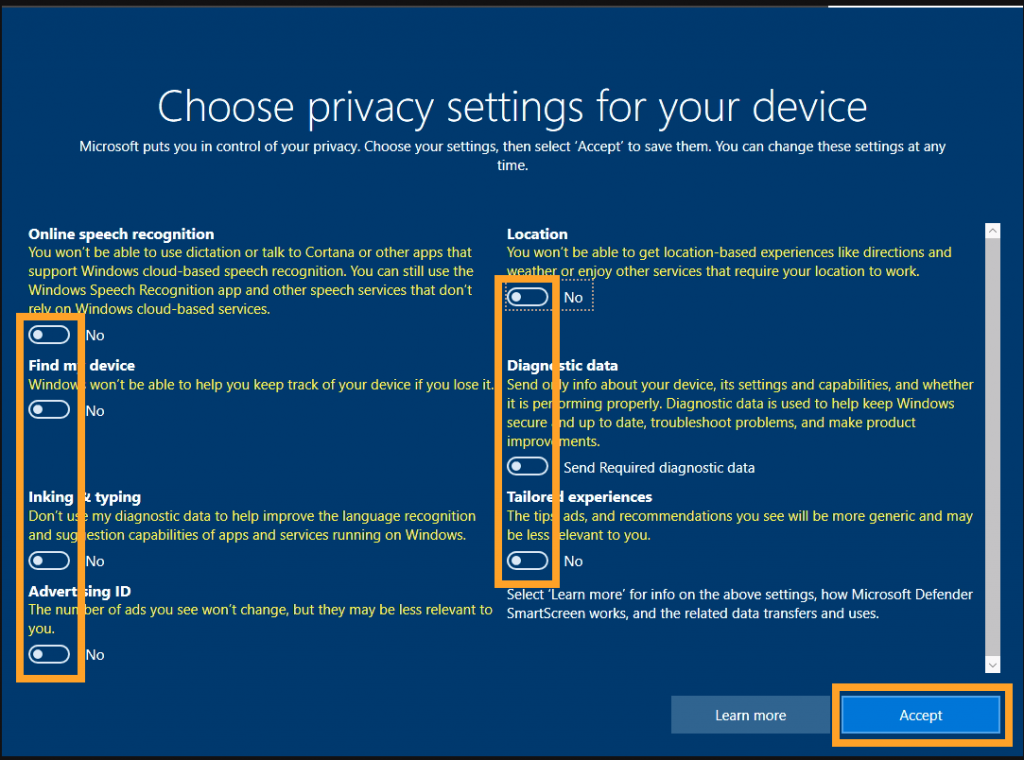
\- Turn **OFF** all privacy questions/settings
{% hint style="danger" %}
#### **Make sure to follow these steps while and after reinstallation:**
**1.** Make an offline account or a new Microsoft account. Don't login to ur old one.
2\. Do not login to OneDrive, Geforce Experience, & Medal using same account.
3\. Install: [https://aka.ms/vs/17/release/vc\_redist.x64.exe ](https://aka.ms/vs/17/release/vc_redist.x64.exe)to prevent any errors.
{% endhint %}
***
{% hint style="success" %}
#### **HOW TO CHECK IF MY RAID WORKED AFTER REINSTALL?**
* **Open Task manager**
* **Click Performance**
* **Click on "Disk 0 (C:)"**
* **Should say on top right "AMD-RAID"**
{% endhint %}
### WHEN YOU ARE ON WINDOWS
🔹 STEP 5: CHECK OLD VS NEW SERIALS
Now, use the "**serial checker.bat"** and see if the serials are changed, compare old vs new. If not changed, **contact support, and we will find a solution.** 🤝